

Everything you need to know about web image optimisation
Images have a considerable role in the universe of the web. The information given by the image reaches your brain faster than text does. Indeed, adding good-quality pictures into your text will lighten up the text and make the document easier to read. Nevertheless, the visuals need to be coherent with the text. If you read our blog regularly, you will know how important visuals are to us. To date, you knew that adding a picture to your script is appreciated, but did you know that an image could improve your positioning on Google and user experience if the optimisation is efficient? Optimizing images helps reduce their size, this helps accelerate the loading time of an internet page and enhance its performance.
“Image marketing increases the web traffic by 12% compared to those who don’t use any, this is why the graphic quality of a website is so important!” (Reference: business-aptitude.com)
You are looking into creating your own website and adding images to it. But you do not know how to choose your illustrations and how to optimize them. Today’s article is a simple guide that will explain why and how to optimize images on your website.
Table of contents
1. Why should you optimise an image for the web?
Good image optimization can considerably improve the referencing of your website and allows you to improve your user experience (UX). Find below the main advantages that image optimization could bring to your brand.
a. Improving the ranking of your website
Image optimization helps your company gain a better website ranking. This is a good way to improve your statistics like the conversion rate and the click-through rate, which are really important criteria to help boost your SEO. Indeed, when the search engine, Google, notices a high level of conversion they improve the ranking of the website as they will find that the content will interest the web user more. You are probably asking yourself how can an image change the statistics? It is easy, there are millions of people who use Google images to discover and explore visual web content and when they click on an image, they are directly redirected to the website.
“62% of Gen Z users prefer to search by images compared to any other technique.” (Reference: semrush.com)
Images are important traffic generators; they should not be neglected. Furthermore, the images help visualize the written content of a website which enhances the user experience. An individual will stay longer on your website if he finds that the images are coherent and of good quality.
b. Reduce the speed of a loading page
Optimizing the images on your website will lighten and improve the loading speed of your website. It is an important criterion to guarantee a better experience for the internet users. The websites that load their content in less than 3 seconds are those that convert better and have the lowest bounce rate. Moreover, if a web page takes time to show up, the user will get bored and leave the page and will go and find what they are looking for at a competitor.
“53% will leave your website if it takes more than 3 seconds to load.” (Reference: mlocalseo.com)
This element joins the natural reference point of a website. The loading speed is an aspect that Google looks into when ranking web pages. When a Google robot visits a web page and finds that the loading speed is slow then SEO ranking goes down. Did you know that Google’s speed reference in between 2 and 3 seconds?
c. Saving time and space
The last advantage, but not the least, is the fact that you are able to save time and space thanks to the optimization of the images. Indeed, when you compress your media, you can save up some storage space of your hosting provider. Depending on the host you chose, you have a well-defined and therefore limited storage available. So, the more you compress your images the less space it takes on your server and you will be able to upload more content to your website. Additionally, your files will be less heavy and as a result, your website too. When you will need to transfer the domain name or make backups of your database or modify your source files, then, this will be done faster than if your images were not well optimized. In short, it’s a huge time saver.

2. How to optimise an image for the web?
Now you know the main benefits of good image optimization for the web, now you need to know how to optimize your pictures. Here we are going to explain step by step the different tools that you will need to put in place to optimize your media. Ideally, you will adopt all our tips simultaneously in order to optimize them to a maximum.
a. Use high-quality images
You should not neglect the importance of high-quality images on the web, they are your website’s visual identity, you should definitely use good quality pictures with ideally a high definition like for your social media. There is nothing worse than seeing pixelized pictures, that are badly framed and blurry. Indeed, if you do use this kind of media, then, your company won’t look professional. Visitors will think that you do not care about the user experience and will leave your website and go somewhere else. Furthermore, the images on your website will end up on Google Images if you name them well and give them the relevant alt tags (see below).
“The web pages with pictures get 94% more visits than those who don’t.” (Reference: treize.pro)
Therefore, if the quality of your image is mediocre, people will not click on it and your chances of attracting more customers to your website will go down, the same goes for your conversion rate. To see if your image is of good quality you need to look at the number of pixels that you can fit into the length of the image. As your picture will be on the web, a resolution of 72 pixels per inch is more than enough.
b. Choosing the right format
The types of images used the most on the web are JPG, PNG, and GIF. These three formats have a low download weight. You don’t know which one to choose? We are going to describe each format down below and give you their principal characteristics.
PNG : it allows you to save the picture with more than 16 million colours, this gives you the opportunity to show a nice quality picture. You can also play with the transparency. This format is mainly used for logos and infographics. It is also ideal for creating edits.
JPG : like PNG, this format can handle more than 16 million colours, so it is also a good quality format. We use this format for the rest of the images on the web, it is the lightest format and is also good for compressing your images.
GIF : this format is used for animated pictures. Unlike PNG and JPG, the GIF can only handle 256 colours, but it does tolerate transparency. It is not advised to use this format on the web, but using it on your emails is interesting as you can animate your text without adding a video. For example, you can add one to redirect the lecturer to your website, it is a good way to gain their attention.
3. Resize and lighten the image
When you import your high-definition pictures directly from a website, they will be very heavy which will slow the download time which people will not appreciate. It is strongly advised to reduce the size of the picture this will lighten up your website. Luckily, you can make images smaller without losing any quality. You can also compress your pictures, thanks to free software online like GIMP, Compressor, TinyJPG (only for JPG), and TinyPNG (for PNG).
“A compression rate of 65% to 70% is optimal to use in a website.” (Reference: combustible.ca)
These tools will help you lighten your images and play without changing the quality. Beware! Do not forget that a high compression rate could make the image quality go down. You need to find the perfect balance between the compression rate and the size of the file. It is recommended that the total weight of a website should be under 1 or 2 MB so images should not be over 200 B.
d. Renaming the image and defining the ALT Tag
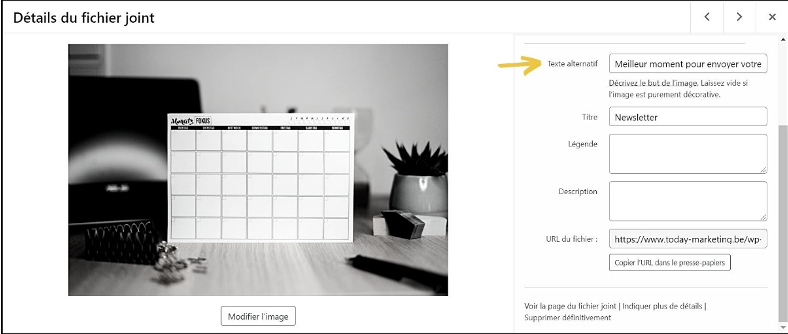
Google does not know how to look at pictures and he does not know what is in them, but Google can read and recognize them. It is possible to contextualize them by renaming or giving them ALT Tags. As we have already mentioned, images help optimize the ranking of your website if our recommendations are put in place. You should rename them correctly and not leave them with their original name like “image002”. It is necessary to rename your pictures using keywords from the article or page.
This will help you improve your SEO as people will get access to your website more easily as you will appear in the google search for keywords. Next, you can add a small description of 125 characters maximum, this is the ALT Tag. This functionality should not be neglected as it helps search engines like Google to find your image thanks to the keywords. If you use CMS WordPress you can simply add them in the “alternative text” box.
3. Using copyright free images
You like a picture on the web and think that it will go perfectly on your website? Simply adding the reference and the author is not enough to use the image freely. Copyright protects images so if you really do wish to use a picture you need to contact the owner and ask for their permission. Nevertheless, this is not the only way to use images that do not belong to you. You can find copyright free image banks with free images. We have already recommended some image banks such as Pixabay in the last article but here are some more: Burst, Unsplash, and Pexels. Make sure that the picture you choose is definitely free you can randomly land on an ad image and have to pay! Moreover, it is best that you use your own images as people do prefer original content. The more unique your images are, the more you will stand out from your competitors.

To conclude, adding visuals is a great way to draw people’s attention and get them to appreciate their visit. It is also a great way to improve your website’s ranking without using too much storage space provided that you follow every step in this article on optimizing your images. Overall, you need to choose high-quality pictures and preferably your own visuals. Next, you will need to edit them before adding them to your website. Here we mean; choosing the right format, reducing and compressing the image as much as possible without deteriorating the quality of the picture. It is also important to not forget to rename your images and add the ALT Tag and use the correct keywords to help Google contextualize your picture.
We hope that you enjoyed reading this article and that it was enriching. Do you need good-quality pictures, or do you need to verify the performance of your website? Do you have other questions about the optimization of your images for the web? Contact us! We would be over the moon to answer your questions, to give you recommendations, or to accompany you in your project.